Intro - BERT and Finetuning
If there is ever an NLP buzzword for the past few years, it should be BERT. You can see it in most blogs, products, and even research in the field of Natural Language Processing(NLP). BERT (Bi-Directional Encoder Representations from Transformers) is a pre-trained NLP model developed by Google back in 2016. The idea behinds BERT follows the general philosophy of NLP work in recent decades - generating embeddings that contain rich relations between words in human languages and using the embeddings for a variety of downstream tasks. Please see my previous blog post for a more detailed walk-through of what word embeddings are and how they can be used.
BERT addresses a series of problems that previous NLP models have. Models like Word2Vec can generate pretty accurate word embeddings with enough training data - for example, producing vectors such that V(king) - V(man) + V(woman) = V(queen) - but it does not address the problem of the same word having multiple meanings. Because it only looks at a fixed window when doing training, the only thing that determines the embedding of a given word is the words that appear around them in the training data set. Therefore, sentences like “I withdrew some money from the bank” and “I was sleeping on the bank of the river“ would produce very similar embedding for the word “bank” despite it having essentially different meanings in the two sentences. BERT addresses this problem by using what’s called the Transformer architecture with self-attention layers (it is an encoder of the Transformer architecture to be precise). The architecture is a bit complex to understand for beginners in NLP, and I would recommend reading this blog post for a detailed introduction of the architecture . Essentially, what BERT does is that it lets every word to generate “attentions” with other words, including itself, in the sentence. This would generate dynamic relations between the words that will indicate their semantics in a given sentence.
The original BERT pre-trained models have two versions - BERT BASE and BERT LARGE. As their names indicate, the former in the base model comparable in size to the OpenAI Transformer, and the latter is a ridiculously huge model that achieved the state of the art results reported in the original paper. Both models are incredibly accurate by themselves, but BERT has yet another design that makes it even more powerful for downstream tasks - fine-tuning.
Fine-tuning is the process where developers train extra layers outside of the BERT pre-trained models to achieve specific tasks. These tasks include text classification, sentiment analysis, name-entity recognition, question answering, and more. Google actually provides code for several fine-tuning processes in its original open-sourced BERT code, and today I am going to look into the source code of arguably the most common fine-tuning task used for BERT - classification.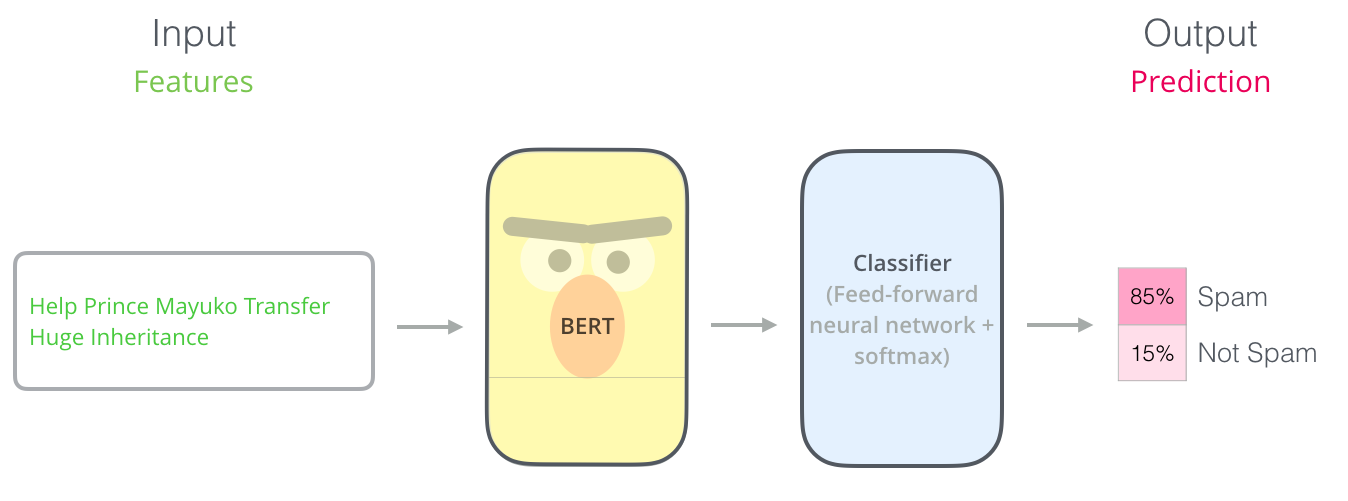
As the above image illustrates, for classifiers, we are adding another layer for classification (e.g. softmax) based on the pre-trained BERT model. In training the whole model altogether, there will be minimal changes to the original BERT models while achieving state-of-art text classification performance.
Run classifier source code walkthrough
The source code I will be referencing below comes from the run_classifier.py and modeling.py files under the original BERT source code folder open-sourced by Google. I ran the programs in debug mode to trace through every step of the process.
Reading and pre-processing data
Below is the main function of the run_classifier.py program.
1 | if __name__ == "__main__": |
Let’s start by setting a break point at tf.app.run() and run the program. After some initiations for tensowflow, you should go into the below blog of code.
1 | if FLAGS.do_train: |
This code block is where BERT reads in the data and determines the train steps. The num_warmup_steps variable seems a bit strange here. Like its name suggests, what it does is that it makes the learning rate small at first, and then use the normal learning rate after warmup.
After setting up the initial parameters for later training, the next step is preparing the data into the format that can be fed into BERT. This is achieved with a call to the following function:
1 | file_based_convert_examples_to_features( |
Now we step into the function to see exactly how that works
1 | def file_based_convert_examples_to_features( |
This function accomplishes several things: it converts the output file to TFRencoder to make the program run faster, updates the user by printing the process after every 10000 iterations, and lastly, calls again to the convert_single_example function (#decomposition).
Now we will step in to the convert_single_example function.
1 | def convert_single_example(ex_index, example, label_list, max_seq_length, |
As commented above, this function Converts a single InputExample into a single InputFeatures. Don’t worry if this doesn’t make any sense for you, I will include a visual example later. But before, there are several variables you need to know:
- input_ids - Indices of input sequence tokens in the vocabulary (vocab.txt file in the BERT folder)
- input_mask - Use to indicate which words will be put on “masks.” Words that are unmasked will not be used for self-attention training later
- segment_ids - Use to indicate different sentences in the training process. 0 would indicate the word is in the first sentence, and 1 the second.
These three are essentially the most important information BERT needs for our data to be fed into its neural network. As you can see after this information is initiated, BERT tries to tokenize text_a and text_b (if the latter exists) using its own tokenizer function. It is not very different from normal tokenizers except it uses something called the wordpiece technique. It achieves the effect of tokenizing “Jacksonville” into “jack”, “##son”, “##ville,” thereby having smaller and more tokens to feed into the neural network. If you wish to see how to word piece is used, you can step into the tokenizer function to see how it does that (spoiler alert: they use greedy algorithm).
Taken together, what this function does essentially is that it creates a label_map_ and tokenize the words using word piece. It considers whether the second sentence is present. And add the CLS and SEP token in places they should be.
- CLS stands for classification - it is used in classification tasks and placed as the first token in the list
- SEP stands for separation - it is placed between the two sentences to indicate where the first sentence ends
The following code block is pretty intuitive and easy to understand - it accomplishes these tasks
- Add CLS to the beginning
- Add segment_id_, which is all 0 for the first sentence
- Add SEP to indicate the end of the sentence
- Do the same for the second sentence
- For easy look up the vocal.txt and convert the word to their ids
This will pre-process the data into features that can be fed into BERT’s API
1 | tokens = [] |
Then we go back to convert to feature function and read all the data into features by calling the previous function
1 | def create_int_feature(values): |
Now we move to the only place in the run_classifier.py program you need to modify for your classification task, and the only thing you need to do is to finish the DataProcessor template, which pre-processes your data before feeding them into BERT’s neural network. So below is the template:
1 | class DataProcessor(object): |
If you finish writing this class, you have a fine-tuning program ready to run for BERT! In the next part, I will show you a short demo that shows how to use run_classifier to compare similarity between two sentences.
Demo: similarity between two sentences
For this demo, I want to compare if two sentences are semantically the same despite having different wordings. The data I obtained came from Ant Group, a fintech company in China (it recently went public and has probably one of the biggest IPOs in China’s history). So each line in the data file consists of an index, two sentences, and either 1 or 0 indicating whether they mean the same. It looks like this:

The data are randomly put into three sets - the training data, testing data, and evaluation data.
The first and only step I took was to rewrite the DataProcessor class, which you can see below.
1 | # My own processor designed based on the template |
The three functions for getting the training, testing, and evaluation data set are essentially the same; so I will go over only the get_train_examples function. It firsts define a file path (where the data is on your computer), and opens the file with that path. It then uses the split function to split the line into three elements we want: the first sentence, and the second sentence, and the label. Finally, it stores them into an InputExample type, which is then ready to be fed into BERT. The result of the pre-processing looks like this

The last thing to do before running the programs is adjusting the parameters. You can do this in most Python IDEs. I use PyCharm, which has the “Edit Run” option that lets you save the custom run parameters. The following are the parameters I set.
1 | --task_name=sim #which task you want it to perform |
With that, you are ready to hit the run button! It will take a while for the program to run depending on how large your data is and the computing power of your computer. On my MacBook Pro, it ran pretty fast, and after running it gives me the following evaluation results:

As you can see, the accuracy is 0.75 at the end, which definitely has room for improvement. At the same time, it is important to note that my training data set only has 144 entries - it would be impossible for any previous NLP model to achieve the same performance with so few data. This speaks to the power of BERT. With a comprehensively pre-trained model, it needs far fewer task-specific data in the fine-tuning stage to achieve state-of-art performance.
I hope this walkthrough and demo is helpful for you:) If you have any questions or suggestions, you can reach me at jchen23@stanford.edu.